Start Here: Color Codes, Gas Families, Bulk Oxygen and a Manifold Room
This is not a slideshow about the platform. This is a live slice of the Med Gas Technician course — the same practice tools your team would use, including a real outlet-repair workflow.
Know the Colors
Which color code is oxygen?
Oxygen
O2
Tap a color. Every option is an NFPA 99 (US) medical gas color.
Sort the Gases! Click and Drag to Categorize Correctly
Sort the gases
This is one of the same exercises technicians do in the full Med Gas Technician course.
Drag from here
Patient Medical Gas
Suction
Medical Support Gas
Bulk Oxygen: The Basics
Interactive Manifold Pressure Simulator
This is a cover-off high pressure x high pressure oxygen manifold with three H-Cylinders per bank. Each cylinder has a copper pigtail and a check valve at the header.
Click any of the valves shown on the simulator to see the flow and pressure of oxygen through the manifold. Open a cylinder valve, then that bank’s Header Valve, then an isolation valve before a line regulator, then the isolation valve after it, then the Source Valve. If you’re unable to click or tap for some reason, you can use the keyboard: Tab to a valve and press Enter or Space.
Red is cylinder pressure up to the bank regulators, about 2,200 psi. Yellow is the intermediate pressure between the bank regulators and the line regulators. Green is 50–55 psi line pressure out to the facility.
Oxygen cylinder manifold
Interactive Virtual Manifold Room
Enjoy this 3D medical gas manifold room experience. Coming to an IMAX theatre near you.
A Real Repair Workflow
This is one example of a specific outlet repair workflow. This one is the BeaconMedaes Series B pin-index style outlet. Your technicians’ course would have all the specific medical gas outlets in your facility; BeaconMedaes, Amico, Allied, etc.
Workflow Videos
Workflow Video
NOTE:
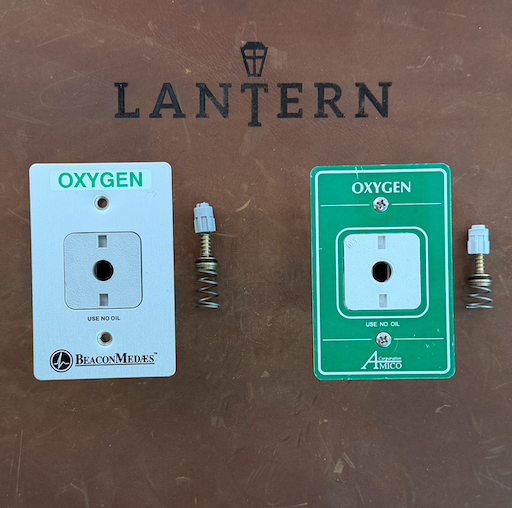
If you have Amico “SeriesB” style outlets, this process will be the same, but the main spring will be slightly shorter. See picture for comparison.
Workflow Steps
Step 1: Gear Up
- Snap-ring pliers
- Screwdriver or drill
- Brass picks
- Krytox
- Gloves on!
Step 2: Remove Finish Assembly
- Remove two screws and pull finish assembly straight back out of the rough-in.
Step 3: Remove Primary Components
- Flip the assembly over and use your snap-ring pliers to remove the snap-ring holding the primary check in place. Remove all 5 internal components (brass poppet with main spring, plastic dust seal with spring, and snap ring).
Step 4: Remove Front O-Ring
- Use brass pick tool to pull O-ring out of the front of the stainless steel barrel just behind the U clip.
Step 5: Replace Front O-Ring
- Put a thin coat of Kryptox on replacement O-ring and put it back in the groove from whence it came. This part can be a little tricky, but you’ll quickly get the hang of it! First, push the new O-ring in from the back of the barrel toward the front. Second, turn the outlet over and using the front for access get just a little bit of the new O-ring seated into the groover where it should live. Third, flip it over and use your pick from the back again. Push down on the side of the O-ring opposite the part that is in the groove and the O-ring will seat itself.
Step 6: Prep New Parts
- Put a thin layer of Krytox on the small O-ring on the new brass poppet/spring assembly (you may need to push the spring onto the poppet before installing). You don’t have to remove this O-ring to apply the Kryptox.
Step 7: Reinstall Parts
- Put the dust seal/spring back onto the end of the brass poppet assembly before reinstalling. Hold all of those parts upright and slide the outlet finish assembly down over them so everything stays together. Flip it over, push down the spring with you thumb, and use pliers to re-install the snap-ring. Make sure the snap-ring is fully seated in the groove where it lives; you will usually hear a little click once it gets in there.
Step 8: Wrap It Up
- Install finish assembly back into rough-in by replacing the two long screws. Alternate incrementally between the two screws as you drill them back in to keep finish assembly straight.
Step 9: Re-test Outlet
- Check for correct pressure & flow
- Make sure all leaks have been fixed
Step 10: Document
- Update your work order and CMMS to finalize the job and show the repair has been completed.
Documents & Manuals: View or Download

That's how Lantern teaches: you do the work, then you remember it. When you are ready, hit Next Lesson.
Next step
Keep moving through the course
Finish this step when you are ready. Your progress will carry forward automatically.